Last updated: November 15, 2026
Quick answer: a shower pan leak test uses 3 basic items — a drain plug, tape, and a flashlight — and 1 simple flood test. This article explains how to test a shower pan for leaks by plugging the drain, filling the pan, marking the water line, and checking whether the level drops or water shows up in nearby rooms. If the level stays put, the pan is likely holding. If it drops, the leak is usually in the pan, the drain area, or the seal around the edges.
Key takeaways
- A leak test for a shower pan starts with a drain plug and still water, not with guessing.
- Mark the water line before you wait, or you will not know if the level changed.
- A flashlight helps you spot damp joints, stains, and drips outside the shower.
- Nearby rooms can show the failure before the shower pan itself looks obvious.
- If the water level falls, the test tells you there is a problem, but not the exact repair.
What is the shower pan leak test?
The shower pan leak test is a flood test that checks whether the pan holds water without loss. You plug the drain, fill the base with water to a shallow level, and watch for a drop in the water line and signs of seepage around the shower.
This is the right test when the shower looks fine on the surface but water is still turning up where it should not. A cracked pan liner, a weak drain seal, or a failed corner joint can all let water escape while the shower still looks normal from above. The test is not meant to diagnose every repair, and it does not replace a closer inspection if the test fails. If the result is unclear, consult a professional and compare it with guidance from the International Code Council and the Tile Council of North America.
A basic flood test uses only a few simple items: a drain plug, water, tape, and a flashlight. The tape matters because you need a fixed mark on the wall or tile so you can compare the starting level to the later level. The flashlight matters because small leaks often show up as dark spots, damp grout lines, or a wet baseboard before they become obvious puddles.
This test is useful for homeowners learning the problem, but it is not the page for fixing a leak at the drain or deciding whether a pan needs replacement. Those are different jobs. If the test points to a failure, the next step is to trace where the water escaped, not to assume one single cause.
How do you do a shower pan leak test?
You do a shower pan leak test by sealing the drain, filling the pan with water, marking the level, and watching for changes over time. The steps below keep the test simple and repeatable.
-
Clear the shower floor. Remove mats, bottles, and anything that can block the water or hide the edge of the pan. You need an open surface so the water level is easy to see.
-
Set the drain plug in place. Use a proper drain plug that fits the shower drain opening, not a loose cover that can shift. If the plug does not seat tightly, the water can escape through the drain and give a false result.
-
Add water slowly. Fill the pan with water to a shallow, even level that stays below the threshold where the shower door or curb could be affected. The goal is enough water to test the base, not enough to force splash over the edge.
-
Mark the water line with tape. Put a piece of tape on the wall or tile at the exact water line before you walk away. A fixed mark is the easiest way to tell whether the level changed later.
-
Wait and check the line again. Leave the water in place and return later to compare the line to the tape. If the water has dropped, the pan or drain area is losing water.
-
Inspect outside the shower with a flashlight. Look in the room next to the shower, along the baseboards, and around the ceiling below if there is a lower level. Any new damp spot, stain, or drip matters.
-
Watch the corners and curb. Examine the joint lines where the pan meets the walls or curb. These are common places for failed seals to show up as darkened grout, soft material, or damp edges.
-
Drain the pan after the test. Remove the plug and let the water out only after you have noted the result. If you need to show the condition to someone later, write down what you saw before the water is gone.
The test works best when you keep the setup plain. A pan that holds water for the full test period without visible loss is a better sign than one that is only partly full or checked without a mark. If the level drops at all, treat that as a real clue, even if the shower floor still looks dry. If you are unsure, consult a professional and compare the result with the waterproofing and flood-test guidance from the International Code Council and the Tile Council of North America.
What should you look for during the test?
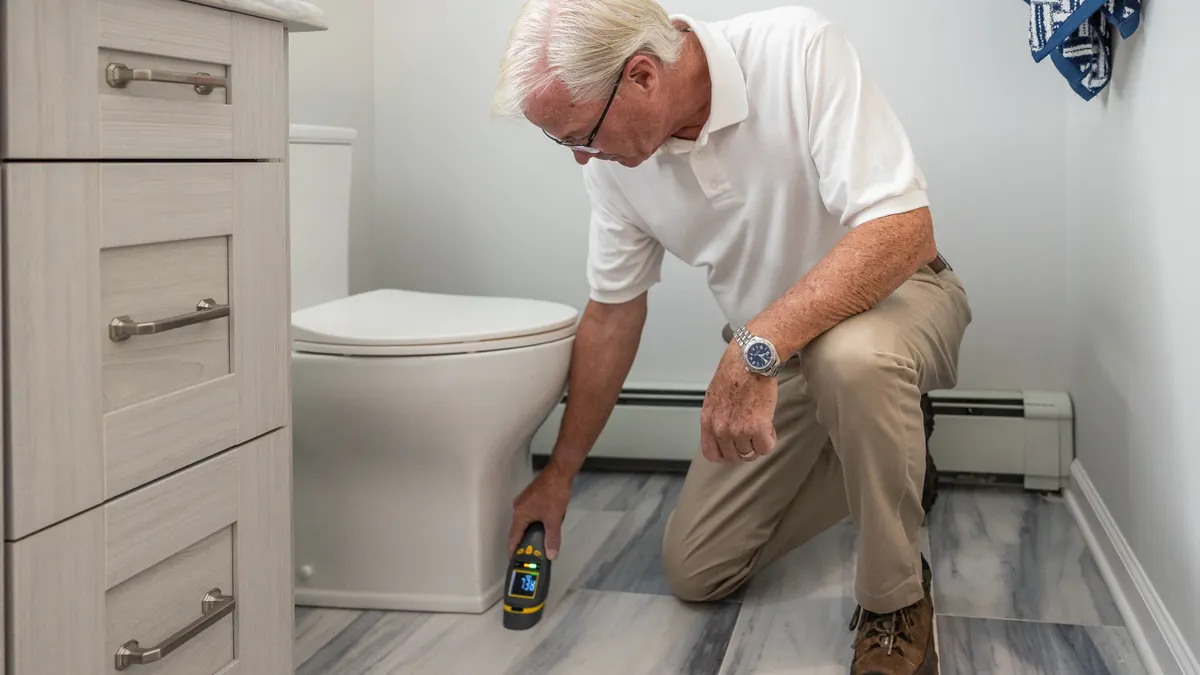
You should look for a falling water line, damp grout, wet trim, and any change in adjacent rooms. A shower pan leak rarely announces itself in only one way, so the water level is only part of the picture.
The first thing to watch is the tape mark. If the water line is below the mark after the wait, the pan is losing water somewhere. That loss may be slow, so the change can be small and still meaningful. A tiny drop can matter more than a dramatic stain. If the level changes and you are not sure what it means, consult a professional before repeating the test.
Next, check the shower itself. Look at the corners, the curb, and the base of the walls. A flashlight helps reveal sheen on tile, dark lines in grout, or water clinging to edges that should be dry. If the shower has a visible seam or transition strip, look there too.
Then check the room around the shower. A leak can show up in the next room before it pools inside the shower area. Pay attention to baseboards, nearby flooring, and any ceiling below the shower if the layout allows it. A musty smell can be a clue in some cases, but this page is about visible leak signs, not odor diagnosis.
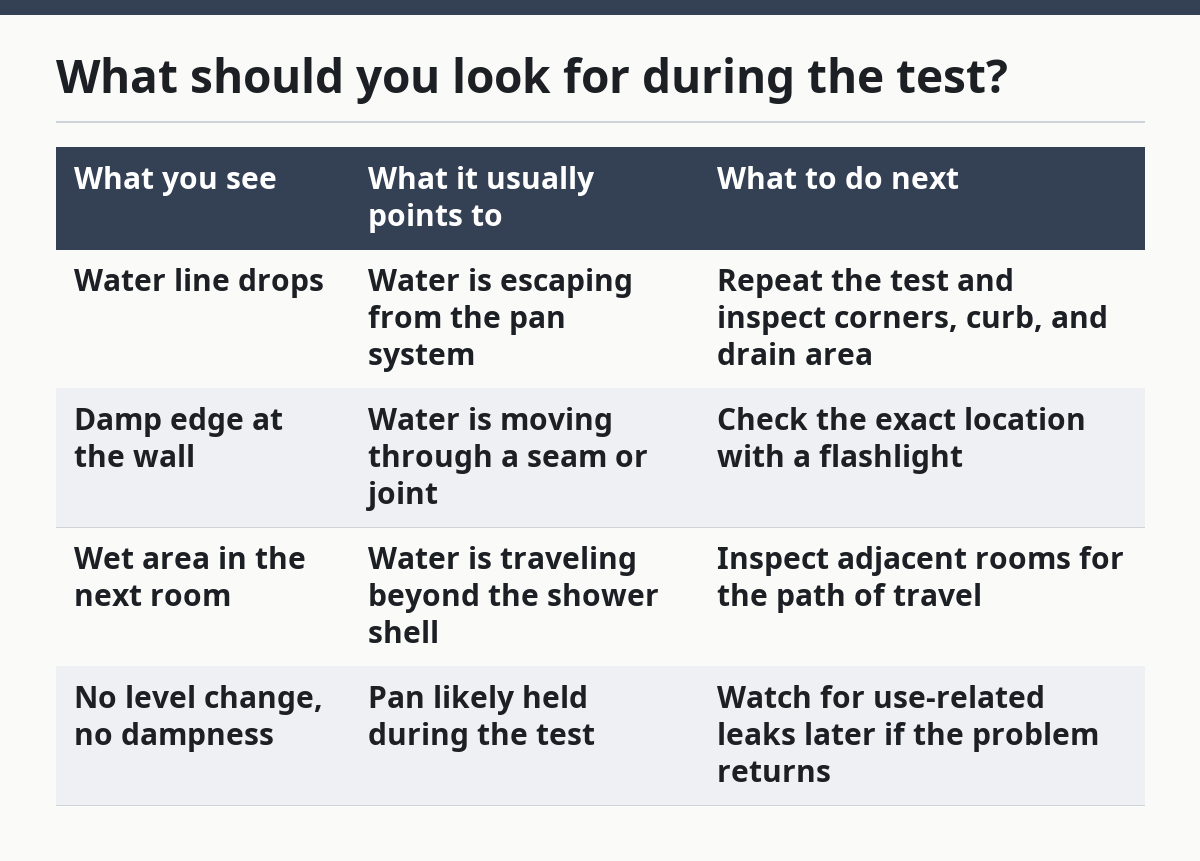
| What you see | What it usually points to | What to do next |
|---|---|---|
| Water line drops | Water is escaping from the pan system | Repeat the test and inspect corners, curb, and drain area |
| Damp edge at the wall | Water is moving through a seam or joint | Check the exact location with a flashlight |
| Wet area in the next room | Water is traveling beyond the shower shell | Inspect adjacent rooms for the path of travel |
| No level change, no dampness | Pan likely held during the test | Watch for use-related leaks later if the problem returns |
This is the part many generic guides skip: the leak may be small enough that the shower still looks usable. The test is not about drama. It is about a clear before-and-after comparison.
What does a failed test usually mean?
A failed test usually means water is getting past the shower pan system, but it does not tell you the exact repair by itself. The leak can be in the pan surface, around the drain, along a joint, or at a corner where water has a path out.
That is why a failed test should be treated as a clue, not a final diagnosis. If the water drops and the leak appears in a nearby room, the path of escape may be away from the spot where you first see the damage. Water often follows the easiest route, and that route is not always straight down. If the result points to a larger issue, consult a professional before opening the floor or wall.
The practical response is to note where the signs showed up first. Was the dampness at the curb? At a wall edge? At the floor outside the shower? Those details matter because they narrow the problem area. A leak at the drain is a different problem from a leak at the perimeter, and this page does not try to solve those separately.
A failed result is also a reason to be careful with repeated flood tests. If the structure below the shower is already wet, repeated filling can add more moisture before the source is understood. One clear test result is enough to know that the shower pan is not holding as it should.
What mistakes make the test misleading?
The biggest mistakes are a loose drain plug, no water-level mark, and checking too soon. Those three errors can make a sound pan look bad or hide a real leak.
A loose drain plug is the most common problem because it lets water escape through the drain opening. That creates a false failure. The fix is simple: use a drain plug that fits the opening snugly before you add water.
Skipping the tape mark is the second mistake. Without a fixed line, a small change in water level is easy to miss. A few millimeters can matter, and a person trying to remember the starting line usually guesses wrong. Tape gives you a clean reference point.
Checking only the shower floor is another miss. Some leaks show up in the room next door, not in the pan itself. A flashlight and a quick look at nearby baseboards, trim, and lower surfaces give the test real value.
Short waits can also mislead the result. A shallow pan may show a fast leak, but a slower one needs time to reveal itself. If you rush the check, you can walk away with a false sense of security.
Finally, do not add extra water just because the level seems low. If the test is already in progress, changing the fill level can blur the result. Keep the setup steady and compare the line you marked at the start.
When should you repeat the test?
You should repeat the test when the setup was shaky, the drain plug moved, or the first result was unclear. A repeat is also useful if you need to confirm whether the first drop was real or just a bad setup.
If you suspect a testing mistake, repeat the flood test with the same basic steps: drain plug in place, water added slowly, tape mark set, and flashlight ready. Consistency matters more than speed. A second pass with a better setup can separate a true leak from a false alarm.
A repeat test is also sensible after a visible repair has been made, but only if the repair is meant to hold water. The point is to confirm that the pan now holds a stable level and that no new damp spots appear outside the shower. If the same drop shows up again, the problem is still open.
Do not keep repeating the test for the sake of it if the pan clearly fails each time. At that point the question is no longer whether the pan leaks. The question is where the water is escaping and what repair is needed, which belongs to a different article in the shower pan maintenance and troubleshooting hub.
How do you tell if the leak is in the pan or nearby?
You tell the difference by matching where the water level drops with where the dampness shows up. A pan leak often shows at the shower base, curb, or adjacent floor, while a nearby problem may show higher up or in a different room path.
If the water level falls and the base of the shower or the room beside it gets wet, the leak is likely tied to the shower pan system. If the water level stays steady but you still see moisture elsewhere, the source may be outside the pan test itself. That is why the test has to be paired with visual checks, not used alone.
A useful clue is location. Water at the shower edge points one way; water in the next room points another. A flashlight lets you see the difference in wet sheen and stain pattern. Tape gives you the water line. Together, those two simple tools make the result easier to trust.
This page is not the repair guide for a drain leak, and it should not pretend to be. The job here is to identify whether the shower pan holds. If it does not, the next step is to follow the wet trail and decide which part of the assembly is failing.
FAQ
How long do you leave water in a shower pan test?
Leave the water in long enough to see whether the level stays at the tape mark and whether any nearby area changes. A short check can miss a slow leak, so patience matters more than speed. Keep the setup unchanged during the wait so the result stays clear.
Can you test a shower pan without tools?
Yes, but the result is less dependable without at least a drain plug, tape, and a flashlight. The drain plug is what makes the flood test possible, and tape gives you a fixed water line. A flashlight helps you catch damp spots that plain sight can miss.
What does a failed flood test mean?
A failed flood test means water is escaping from the shower pan system somewhere. It does not name the exact repair by itself, and the leak may be at the pan, the perimeter, or the drain area. The next step is to note where the water showed up and trace the path carefully.
Drafted with AI; not yet reviewed by a person.
2 thoughts on “How to Test a Shower Pan for Leaks”